Search This Blog

Sunday, December 30, 2012

Good-bye 2012!

Pin It
It seems as if everyone here in the blogging world is doing a year-in-review post,
I thought I'd jump on the bandwagon, cause I like the idea :)

It's been another wonderful year for us!
My husband got a new job
I had 2 brothers get married
We made lots of fun memories
My husband graduated with his MBA!!
I started this blog
Drove from Utah to California 2 times
We moved 700 miles away from family
We made new friends
Drove from California to Utah once
We got pregnant!
I started making jewelry
And so much more!!

I thought it would be fun to show the top 5 posts from the year,
the posts with the most views by you, so here we go
drum roll please...
Tuesday, December 18, 2012

Snowflake canvas ornaments

Pin It
Hello everyone! 
Hope you are all ready for Christmas, it's only 1 week away!!
We were quite busy this past week. 
My mom flew down from Utah last Tuesday to visit for a week, and we were so excited to have her here.
One of the main reasons why we wanted her to come down at this time, was to get her over to Disneyland to see all the Christmas decorations. She's a big Disney fan, and has never seen all the Christmas decor.
Well, needless to say, she loved it!
It was also perfect timing, because we found out we were pregnant the day before she came, so we were able to tell her in person.
(We actually wrapped up a little box and put the pregnancy test inside. She screamed so loud when she opened it!)   :) 
Among all of the fun things we were able to squeeze in during the week, one of them was these little snowflake ornaments.
My mom, my son, and myself all made one.

Thursday, December 13, 2012

I have an announcement!!!

Pin It
 We are so excited to announce that we're having another baby!!!!!
If you want to check out the tutorial I posted on how to make the chalkboard, click here.
I have of course let my son use the chalkboard to draw on as much as he wants, but
I have been waiting to use it for this exact purpose. A pregnancy tracker!
I feel like I've been waiting for what seems like forever, (it's only been like 3 months since I made it)...patience is a virtue!
So I was so excited to finally bust it out.
I will be using the chalkboard throughout my pregnancy to track the weeks, my stats, and the size of my belly :)
So stay tuned in the coming weeks!!


This post featured at:
The Chicken Chick

Saturday, December 1, 2012

Snowflake canvas art

Pin It
Well welcome December!
I just have to say, I love the sparkly-ness of this craft. 
It seems like at Christmas time everything has a little sparkle to it :)
My son and I made these up the other day to add some more Christmas decor to our home.
It's a fun craft to do with kids because they can just go nuts with the paint :)
He loved it!

Sunday, November 18, 2012

Super hero cupcakes

Pin It
Yesterday was a special day in our home.
The light of our lives turned 4 years old!
I just have to take a moment to brag here, bare with me :)
My little man is the sweetest, most caring, considerate, helpful, imaginative, playful, happy, handsome little guy.
I am so thankful that we were blessed to have him in our lives.
He is our everything!
We did not have a birthday party though, if you remember, we had a BIG Avengers themed party back at the end of August before we moved so he could celebrate with family and friends one last time.
(For that party we had a 
Check those posts out as well if you haven't before, they're freaking awesome :)
Ok, so since we did that huge party, we decided when it was his 'real' birthday we would just celebrate with the 3 of us.
We had a busy day full of activities and play.
Even though it was just us, I HAD to have some sort of cake so he could blow out his candles.

Since my son's 'birthday' party back in August he has been learning more about other super heroes.
His obsession has grown to now include members of the Justice League (Batman, Superman, Aquaman, the Flash, Green Lantern, etc), as well.
I first started out with just the Captain America shield cupcakes, but my husband challenged me and pushed me to try something more difficult.
I'm glad he did, because this is what I came up with.
I was really pleased with the outcome.

The Justice League themed cupcakes.

Saturday, November 17, 2012

Mini Coconut Cream Pies

Pin It
Good morning all!
It's no secret that I love mini desserts.
Maybe I feel less guilty if I'm eating smaller portions...but I don't think it counts if I pop multiple ones in my mouth in one sitting...hmmm, oh well~
On to the recipe!
I feel like pies just come with territory when you're talking about Thanksgiving and Christmas, so lucky for you this post comes right before Thanksgiving, yay!
Guests at your holiday get-together will definitely appreciate the individual serving size :)
I first made these last year for Thanksgiving, and they were DELICIOUS!
Since then, I've actually made these a couple of times, and I've tweaked the recipe to save a little time here and there. Even with that help, they are a little involved, but SOOOO worth it, I promise!
You can do this a day in advance and refrigerate the dough and cream filling if that helps!
Here we go!
Pie Crust
1/3 c. cold water with an ice cube or two to keep it cold
1 3/4 c. all-purpose flour
1 tsp. salt
2 Tbsp. brown sugar
2/3 c. shortening
Pour flour, salt, and brown sugar into a bowl. Using a pastry blender or fork cut the shortening into the dry ingredients until it starts to resemble pea-sized clumps.
Pour in a small amount of water and press the dough together, keep adding small dashes of water until you can form the dough into a ball. Wrap in plastic wrap and refrigerate for at least 1/2 hour. 
(If you want to you can also leave it overnight)
When you are ready, break the dough ball in half and roll it out on a sheet of wax paper sprinkled lightly with flour. Cut out circles and place in a greased muffin tin. Gently push it down so it makes a little cup.
Poke a few tiny holes in the bottom so it doesn't puff up.

Wednesday, November 14, 2012

Fine motor activity

Pin It
Hello everyone!
Hope you are all having a great week :)
Thanksgiving is just 1 week away! Can you believe it??
I am very excited to be able to see family for the holiday, nothing beats that!

Today I've got an awesome activity for the littles.

I actually made this for my son probably a year or so ago, but with our big move 2 months ago, it got thrown away.
The other day my son asked to do this activity again, and it was great because it didn't cost me anything to make it again, I already had everything on hand! 
Yay!
I love this activity because it promotes fine motor skills, and counting.
(Just a side note, I tried to find the blog I got the idea from, but to no avail. If you are out there, sorry I can't link back to you, but thanks for the idea!)

Thursday, November 8, 2012

Thankful turkey craft

Pin It
Since it's the beginning of November, and Thanksgiving is on it's way, last Monday night for Family night I wanted to talk to my son about being thankful.
We have so much to be thankful for, and I want him to understand that everything should not be expected or taken for granted.
I know you have seen turkey crafts ALL over Pinterest, well, here's another one :)
I had taken down our Halloween paper plate crafts and again had our big, empty, white wall.
I decided a new craft should take their place.
This is the 'thankful turkey craft' my son made, that is now hanging on our wall. 

Tuesday, November 6, 2012

Pipe cleaner activity

Pin It
A couple of weeks ago I purchased a pack of pipe cleaners, I was going to do an activity with my son I had seen on Pinterest. 
It was the one where you cut up the pipe cleaners, place them in a bottle, and use a magnet to move them around.
It looked really fun, but I couldn't find a magnet anywhere.
So, this is what I came up with instead.
Supplies
pipe cleaners
empty bottle (I just used an orange juice bottle)
a sharp knife
a push pin
a nail

Sunday, October 28, 2012

Halloween cupcakes

Pin It
I decided I had to do one last Halloween post. 
Get it right in there before the holiday ended :)
It seems like the weekend before Halloween has as much celebrating as the day itself.
I call it Halloween weekend.
Last night we attended a trunk-or-treat.
If you've never been to a trunk-or-treat before,
the adults will line up their cars, usually in some sort of large circle, with the trunks all facing inward, and the kids will go from trunk to trunk for candy.
It was a lot of fun, and my son got soooo much candy.
It's ok though, we will help him :)
About half-way through the trunk-or-treating my husband called dibs on the regular sized Kit-Kat bar,
I will mostly go for anything in there.
Not really Whoopers or candy corn, but other than that I'm in!

People went all out and decorated their trunks.
I was impressed, there was some very creative decor.
There was also a chili cook-off and desserts.
I volunteered to bring a dozen cupcakes, and this is what I came up with.

I saw the mummy idea on Pinterest forever ago, and I always wanted to give it a shot. 
The eyes are just M&M's!
What did you do this Halloween weekend?
What candies do you search for in your kids buckets? 
It's ok, we all do it :)

Thursday, October 25, 2012

How to make a chalkboard

Pin It
I had to do it, I had to jump on the 'make everything into a chalkboard' bandwagon.
It's so clever, I couldn't resist!
I've been seeing DIY chalkboards for like a year now, and my favorite use is the pregnancy tracker idea.
Well back in August, before we moved, my super cute friend/neighbor found out she was pregnant! Yay!! 
I am so happy for her!
I told her we HAD to make this.
It was soooo easy to make!
One thing I regret from when I was pregnant with my son was I didn't take that many pictures throughout the pregnancy, just more towards the end. So I don't really know when I started showing or when I started getting bigger.
We loved this idea because you can write down some info and then stand next to the board in the picture to show off the growing belly as well.
When I get pregnant again, (hopefully in the NEAR future), I am going to do this as well. 
But for now, we'll show off the one we made for my friend.
She ran to Home Depot and picked up a can of chalkboard paint and the board.
It was really long so we cut it in half to the size we wanted.
We then painted the board with the chalkboard paint.
My son loved this part!

Monday, October 22, 2012

DIY Iron Man costume: Part 2

Pin It
My son's costume is done!!
(give me a moment while I victory dance around the family room)
Ok. If you missed the first part of this costume post, you can find it  here: DIY Iron Man costume
As you may recall, the only thing I had left to do on the costume was cover his 
hands and add the blasters.  
Well, today my son and I went grocery shopping, 
and I finally remembered to look for gloves to finish off his costume.
Well, I found them!
They came in a 2-pack for 97 cents!
It was so easy to whip them up, it only took about 15 minutes.
So here are the gloves before...

Friday, October 19, 2012

Felt pumpkin activity

Pin It
You might remember in my post the other day, my son and I made Halloween paper plate crafts to decorate our house, and my son came up with the creative idea to make the witch's hat out of felt...
well, if you don't remember, that's what happened :)
Anyways, I saw this felt pumpkin idea over at 
I decided, since we had the felt out, and the paper plates were drying,
that we should give this craft a try as well.

Supplies
orange felt
black felt
scissors

I first cut out two orange circles for the pumpkin body.  I wanted to do two so my son could mix and match faces.
I then cut out different shapes for the eyes, nose, and mouths.
 Let the fun begin!

Saturday, October 13, 2012

Halloween paper plate craft

Pin It
The first week of October I was mainly focusing on making my son's Iron Man costume, check it out here if you missed that one.
This last week I knew we needed to put up some Halloween decor around the house.
I was strolling around on where else?  Pinterest of course, and I saw a picture of a paper plate ghost over at  Clean & Scentsible. The lady had used the ghost as Halloween decor for a party.
I used the same idea for the ghost, but then we decided we needed a few more pieces to go along with it.
We currently have a big, blank, white wall behind our dining room table, and I thought it would be the perfect spot to display our art work.
Supplies

Saturday, October 6, 2012

DIY Iron Man costume

Pin It
Halloween is on it's way!
Yay!  I love Holidays!  From now until January is my favorite time of the year!
I know, I need to get around to decorating the house, but first we needed to make a costume.
I wanted to give myself plenty of time to make this, in case it didn't work.
My son decided he wanted to be Iron Man this year, thus furthering his super hero obsession...
I decided this was a task we could conquer, and I think we succeeded!
I started with a cardboard box and let my imagination run wild ;)
Total cost for me to make this costume so far...$0, gotta love that!!
I first cut out the 'chest plate' and the part to cover his stomach.

Saturday, September 29, 2012

DIY Jewelry Organizer

Pin It
Hello world!
This week I was in the mood for a project.
This is what I was up to, what do you think??  
I'm pretty pleased with it, I especially love the colors!
I've seen this earring holder idea all over Pinterest,
(so I'm not sure who to give credit to for this awesome idea...)

Tuesday, September 25, 2012

3 months until Christmas!

Pin It
I just wanted to take a moment to tell you all that Christmas is just a short 3 MONTHS AWAY!!!!
(I wonder how many people I just sent into panic mode...)
In honor of that statement I wanted to share a little Christmas craft with you.
A countdown to Christmas!  Yay!
My son and I made this last Christmas, but when we moved (just a short 2 1/2 weeks ago), it got thrown away.  It's ok though, luckily, this is a very cheap and easy craft to make, so we'll probably be making it again this year!
* Since we made this before I had my blog, I don't have a precise step-by-step tutorial, but again it's really easy, and you can just make it your own.
Supplies you'll need
scissors
glue
construction paper
poster board
24 cotton balls
First, I typed up the poem and printed it onto the construction paper (yes, the construction paper will work in the printer), I then cut the poster board in half length-wise.

Saturday, September 22, 2012

Failure: Cleaning cookie sheets

Pin It
The other day my son was playing at a friends house for a little while, I was kind of wandering around trying to figure out what project to start.  
While I was in my kitchen it donned on me, my old horrible-looking cookie sheets!
I had just found a 'trick' on Pinterest, it's supposed to clean off all that dark looking stuff and make them look all silver and shiny again.  All you need to do is grab some baking soda and  hydrogen peroxide, let it sit for a while, and it should wipe right off, NO scrubbing.  (That's the part that caught my eye!)
I am sad to say this is the first time something I've found on Pinterest has let me down :(
Here is what my cookie sheet looked like to start out with, not too pretty, I know...
 I did just what she did, I poured the baking soda on first,

Sunday, September 2, 2012

Magic Cookie Bars (Gluten Free)

Pin It
First of all, this will probably be my only post this week.  WE ARE MOVING ON FRIDAY!!  I figured we'll probably be busy with packing, saying good-byes, and lots of crying, so hang in there, I will come back as soon as I can!
First, a little history about my family and I.  
My mom is a Celiac.  
This means she has a severe allergy towards the gluten in wheat flour, rye, and barley.  She has had this allergy since she was in her early 20's.  In the last few years there have been a lot more cases of this allergy, which also means more knowledge about it has come out.  
I have been making this dessert for my family since I was about 8 or 9 years old.  We all love this dessert, but it's my mom's favorite by far.  I've made it for EVERY family get-together.  Sunday dinners, holidays, birthdays, you name it, it's there.
Last Sunday was our last Sunday dinner with my family, so I had to make it for them one more time.
When we left that night there were lots of tears.  I will miss both of our families very much, but I know this move will be good for us, and it will be a fun new adventure.  
Ok, on to the recipe!

This recipe makes 24 bars.
Ingredients:
6 c. cereal (I normally use Frosted Flakes because they're already sweetened, but I've also used Corn Chex, Corn Flakes, whatever I've got on hand, and just added a little sugar)
* When you are choosing any cereal for the crust, if you do have a gluten allergy, please check the ingredients label first, just to make sure it doesn't have gluten in it!
1 can sweetened condensed milk
1/2 c. unsalted butter
Chocolate chips
sweetened shredded coconut 

Tuesday, August 28, 2012

Avengers Birthday Cake

Pin It
This is my new favorite way to decorate cakes, the possibilities are ENDLESS!!
First off, I just want to let you all know how much this cake cost to make...
Just over $5.00!!!  Yes, you read that right!
All I had to pay for was the two boxes of cake mix (on sale for 99 cents each), and two tubs of
frosting, ($1.50 each). 
So, my two previous posts were how to make a Captain America Shield Pinata, and how to make Avengers masks, add this awesome birthday cake, and you've got a super sweet Avengers themed birthday party!!
I was SOOO excited to do this post!
I love to bake and decorate, but I'm still learning, so when I saw this idea on Pinterest, and knew I had to tackle it.  
I picked out a coloring page that had my son's 4 favorite Avengers, Hulk, Iron Man, Thor, and Captain America.  I didn't know how long this process would take, the party was on a Wednesday, so I started Monday night.  I worked on it for 1 hour, put it in the fridge so it wouldn't get ruined, and then another 1 1/2 on Tuesday night, and that was it!  I had a lot of fun making this cake. 
What you'll need:
the coloring page you want for the final design
wax paper
tape
a piece of glass large enough to tape the paper on to
food coloring
frosting (I just purchased the  Betty Crocker frosting, the one in the small tub)
sandwich bag (I only used 1 sandwich bag!  See how below) or (frosting bag with tips)

Tape your picture underneath the glass so you can see it.

Thursday, August 23, 2012

DIY Avengers Masks

Pin It
* I have a GIVEAWAY going on right now for a chance to win some super hero masks of your choice! It's the most recent post on my blog, just click on the header at the top of the blog (or Home) and it will take you there. Make sure to enter!

Ok, here is my second post from my son's Avengers birthday party.  See my previous post on how to make your own Captain America shield pinata if you missed that one, 'cause it's freaking awesome!
I saw these on Pinterest like a month ago and pinned them immediately.  I had this genius idea, instead of doing little goody bags for the kids, (because my son really never plays with the little toys he gets in there, and they would get enough candy and treats from the pinata), so I would make a mask for each of them.  This way they could also run around with the masks at the party and be little super heroes!
I started these a couple of weeks in advance, mostly so I could just work on them at night while my son was sleeping, and also because I didn't know how long it would take to make all 18 of them! 

Supplies you'll need
sheets of felt in the colors you will need Iron Man (red and yellow), Captain America (blue and white), Hulk (green and black), and Thor (a creamish, skin color, and grey).  (They were 29 cents per sheet at Michael;s, I've heard since you can get them at Wal-mart for 23 cents, saving you money folks!)
scissors
white stretchy elastic
FREE template of the masks found at Cutesy Crafts (this lady did a great job making these templates!  She also has a few other super heroes, and princess crown templates)

black and see-through thread
*Update, I did have someone email me, she said she didn't have a sewing machine, and was wondering if these could be made with a hot glue gun instead.
I whipped up a mask using ONLY a hot glue gun, and it does work just as well! 
I got 4 sheets of each color to use as the base of the mask, then 1 sheet for the colors which are the details on the masks.
For the base of the mask (the main color), use 2 sheets on top of each other, pin the mask and cut out the shape.

Wednesday, August 22, 2012

DIY Captain America Shield Pinata

Pin It
I am so so so excited about the next couple of posts coming up!  Follow my blog so you can see what's coming!  (Just a little teaser, they are related to Avengers birthday party ideas!) 
First of all, I am very happy to have my camera back :).  Note to self: do not leave an expensive camera on top of papers on the edge of the table, because when a toddler wants to grab those papers, everything comes crashing down.  Totally my fault.  I am guilty.  
Anyways, my son's birthday isn't until November, but since we are moving in two weeks (AHHHH!!!), we decided to do an early birthday party for him so he could celebrate with friends and family one last time, and the party was yesterday!  I have been SO excited about this party.  I love planning things like this, and I love to be able to use my crafty skills :)  If you've been following my blog, you may remember I did a post about letting your little ones make their own Captain America Shield, well, after making that shield, and playing super heroes, I think it might have just kept the super hero obsession burning bright :), because my son requested an Avengers party!
Warning:  There are lots of pictures ahead!  I really did miss my camera...Also, guess how much it cost me to make this pinata...anyone?  Nothing!  0!  Zilch!  What made me really happy was I had all these supplies at my house already, (except the cardboard box, I had to find that, but it was free!)
Supplies you'll need:
  • cardboard box
  • a thinner box, ex: cereal, pop can, etc.
  • duct tape
  • scissors
  • glue
  • tissue paper
I thought this was going to take forever, so I started it a few days in advance.  It only took like an hour and a half TOTAL, and that was with 'my little helper' helping me.
Ok, here we go:
First cut out 2 identical shapes of what  you want your pinata to be.  (As you can see my box has black paint all over it, that's because I've been redoing furniture, I will post that later!)
 Then cut your thinner box into strips.  This is what will go between the shapes, so cut them as wide as you want.  Don't cut off the flaps on the box, you will need those in a minute.

Monday, August 20, 2012

Grilled Bruschetta Chicken

Pin It
This recipe is an end-of-Summer must!  With only 5 ingredients and around 200 calories...yeah...easy and healthy!  I found this on Pinterest a while ago, back when we were living in our old house, and had our veggie garden...I know, I need to get over not having a garden anymore...Anyways, I loved this because when I had first found this recipe my kitchen counter was overrun with fresh tomatoes.  It was a nice way to use some of them up.

Ingredients:
  • 2 boneless, skinless chicken breats sliced open to make them thinner (this will give you 4 pieces of chicken)
  • 1/2 c. Italian salad dressing (it originally calls for sun-dried tomato salad dressing, but every time I've made this recipe, I've only had the Italian on hand)
  • 2 tomatoes finely chopped
  • 1/2 c. shredded mozzarella cheese
  • 1 tsp. dried basil
  • salt
If you remember, which I never do, sprinkle the chicken with a little salt, then place chicken and salad dressing in a Zip-lock bag and marinate in the fridge for as long as you've got time for.  As you can see in the picture below, I just sprinkle the salt, and then brush on the dressing.
Turn your grill on to medium, and once it's ready put the chicken on.  Leave it until it's cooked about half-way through, and THEN you can turn it over.  Combine the chopped tomatoes, basil, and shredded cheese in a small bowl, and then top the cooked side of the chicken with the mixture.  Finish cooking the chicken on that side...
Then remove from the grill and serve!
This time I cut the recipe in half since my husband was at work, I was only making it for my son and myself, so that's just 1 chicken breast I used...can you tell which one is his and which is mine?  :)
Recipe from The Girl Who Ate Everything

Wednesday, August 15, 2012

P.F. Chang's Mongolian Beef Copy-cat Recipe

Pin It
We have made this dish at our house multiple times, but this particular post is kind of a sad one for me...not because of the food, the food is AMAZING, but because we are moving in a couple of weeks to California.  We made this last Sunday at my parent's house to celebrate my mom's birthday.  I've always been very close to my mom, I'm the only girl with 4 brothers, so she's always been like a best friend to me, and I feel very blessed because we've lived within 25 minutes of both of our families since basically forever, and we get to do Sunday dinners with my family a lot.  That will be coming to an end soon for us...No tears for now though!  On to this delicious recipe!

Ingredients:
  • 1 Tbsp finely chopped garlic
  • 1/2 tsp grated fresh ginger root
  • 1/2 c. soy sauce
  • 1/2 c. water
  • 2/3 c. dark brown sugar (I have used regular brown sugar as well, and it works just fine, the sauce will just be a little bit lighter of a color)
  • 1 lb beef flank steak
  • 1/4 c. corn starch
  • 1 c. vegetable oil
  • 1 bunch green onions, cut into 2" lengths
  • 1 Tbsp oil
  • Cooked rice
Directions:
Slice the flank steak 1/4" on the diagonal.  I forgot to take a picture of that part...sorry, I was too excited...  After you have sliced all of the meat, coat it in the corn starch and let it sit for about 10 minutes.  Here we have a picture of my younger brother demonstrating for us...

Monday, August 6, 2012

Grocery Store ABC's

Pin It
So, a couple of awesome things about this post;
1. It's educational
2. It keeps your child/children busy and in the shopping cart while you shop, and,
3. it involves stickers, so they'll love it!
Last year, when my son was about 2 1/2, I wanted to find a new way to teach him his ABC's.  Whenever we would go grocery shopping, he would hold onto my list and pretend to 'read' it, and help me shop.  I thought it would be cute for him to have his own 'list'.  My Grocery Store ABC's idea was born!  Each week before we would go shopping I would draw a few pictures of things that started with the letter we were on.  While we were shopping my son would have to point out the items on 'his grocery list' (as he called it), and then he got to pick out a sticker to place by the item he found.  He was also doing pretty well recognizing letters, so I would show him the letter we were looking for, and if he found it in a word on a label, or anywhere else, he got an extra sticker on his paper.  He loved searching for letters, and I was really surprised at how well he was paying attention to words and looking around.
By the way, I am such an awesome artist ;) don't you think?

Sunday, August 5, 2012

Fudgy Brownie Dessert

Pin It
First of all, the most important thing to tell you, is this brownie batter is made by throwing everything in one pot, that's right ONE.  I love anything that cuts down on dirty dishes!!  
So, my husband requested this delicious dessert Friday night, luckily I was able to use his phone to take pictures...yes, my camera is still getting fixed :(.  At least his phone can take really good photos, so I just had to share it with this dessert with the rest of the world!  IT IS SOOO GOOD!  I've made these brownies for A LONG time, like years, that's how are delicious they are on their own, but one night after I'd made them my husband looked through our fridge to try and take them up a notch.  
This is the glorious masterpiece he came up with.  Now we just make the brownies just to have this...

 Ingredients:
  • 1/2 c. unsalted butter
  • 3 ounces unsweetened chocolate (pictured below so you'd know what it looks like)
  • 1 c. sugar
  • 2 eggs
  • 1 tsp. vanilla
  • 2/3 c. all-purpose flour
  • 1/4 tsp. baking soda
Toppings:
  • vanilla ice cream
  • dulce de leche, or caramel
  • shredded coconut
  • whipped cream
  • we've also added chopped nuts before, there's no right or wrong, let your imagination run wild! :)
In a medium saucepan melt butter and unsweetened chocolate over low heat, stirring occasionally with a wooden spoon.  Once it's melted remove from heat.  Stir in the sugar, and then add the eggs, one at a time, and mixing in completely with a wooden spoon after each egg.  Stir in the vanilla.  Then add the flour and baking soda, and mix it all together.
Pour the batter into a greased 9x13 cake pan and bake at 350 for 25 minutes.  Let cool for a few minutes, then assemble the masterpiece.  We spread a layer of dulce de leche, or caramel, on the brownie, then top with the vanilla ice cream, whipped cream, shredded coconut, and on this one I drizzled a little more caramel on top.  Sorry there aren't more pictures of the process, but with just having to throw it all in one pot, I felt there wasn't much I could document...again with the one dish...I know, I know...
Hope you enjoy!

For a printable version of this recipe click here.


Saturday, July 28, 2012

Zucchini Raisin Bread

Pin It
This is the first year we don't have our own garden :(.  It's kind of sad.  I miss going out there everyday looking for new fruits or veggies that are ripe and ready to eat.  One of the things we planted every year was zucchini.  I learned very quickly that I needed to have a good zucchini bread recipe, because we would get A LOT of zucchini.  I found this recipe a long time ago, and over the years I have experimented with it, and changed it.  Thank you to my father-in-law for giving us some zucchini from his garden so I could make some yummy bread!
Warning:  I lost the charger for our camera, so all these pictures were taken with my phone, sorry about the quailty...

Zucchini Raisin Bread
Ingredients:
  • 1/2 c. vegetable oil
  • 1/2 c. applesauce (I like to buy the no sugar added applesauce in the individual serving cups, and one serving cup is a 1/2 c.  Also, if you don't have any applesauce on hand, you can use 1 c. vegetable oil instead. The applesauce just keeps it a little more healthy).
  • 3 eggs
  • 1 3/4 c. sugar
  • 3 tsp. vanilla
  • 3 c. all purpose flour
  • 1 tsp. salt
  • 1 tsp. baking soda
  • 1/4 tsp. baking powder
  • 1/2 Tbsp. cinnamon
  • 2 c. grated zucchini
  • 1 c. raisins

Tuesday, July 24, 2012

Coconut Crusted Chicken

Pin It
I've made this YUMMY recipe a couple of times now, we are big fans here!  Sorry about the fuzzy pictures, my camera is still getting fixed :(

What you'll need:

  • 2 boneless skinless chicken breasts
  • 2 eggs
  • 1/4 c. coconut milk (it comes in a can, and it can be found in the Oriental aisle at the grocery store)
  • 1/2 all purpose flour
  • 1 c. Panko bread crumbs 
  • 1 c. shredded coconut
  • 1/2 tsp. salt
  • vegetable oil
  • sweet and sour sauce for dipping*

Wednesday, July 18, 2012

DIY Captain America Shield

Pin It
My son has become OBSESSED with superheros!  It's kind of sad, he went from toddler to BOY overnight.  
I'm still adjusting.  
Something fun that has come from this new obsession is we now get to play superheros, A LOT.  We switch back and forth between them, usually playing Thor, Iron Man, Captain America and Hulk.    
In order to play we've come up with different things we use.  My son got a little hammer/screwdriver toy set, maybe 2 years ago, so we use the hammer as Thor's hammer.  For Hulk he just runs around and 'Hulk smashes' things :), and for Iron Man he pretends to shoot 'blue lasers' (is what he calls them).  We had a birthday party to go to a couple of weeks ago, so I took my son to the toy section at Wal-mart.  
 He wanted to buy EVERYTHING!  Afterwards the one thing he kept talking about was this Captain America shield he had seen, and how badly he wanted it.  It was like $15, and it was just basically a frisbee with a little hand strap, so it gave me an idea!
We were out of milk, so I made a trip to Costco, (I could have gone to Wal-mart, but I knew if I went to Costco the milk would come in this box, and it is the perfect size).
We first cut out a circle...

Tuesday, July 17, 2012

Baking Soda and Vinegar

Pin It
I found this awesome idea and wanted to try it out with my little guy, he LOVED it!!  He calls this his 'science experiment'.  Great for a rainy day, it kept him occupied for over a 1/2 hour!
What you need:
  • a pan of baking soda
  • bowls with vinegar 
  • food coloring
  • and something to squirt out the vinegar.  I used one of those baby medicine syringes.  (see picture further down).
 We took the syringe and pulled up the back to suck up some vinegar, my son then squirted it into the baking soda.  He loved the reaction it made!  It foams up, and then down and turns into this soft feeling almost moon sand texture.

Saturday, July 7, 2012

How to Clean Car Mats

Pin It
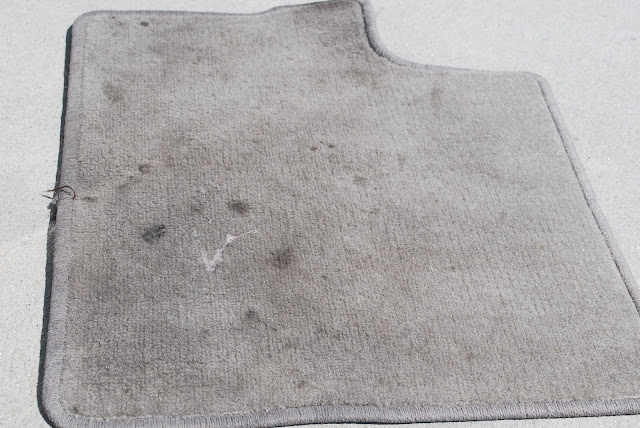
Another post about cleaning!  Yay!  This post actually coincides with my previous post about cleaning my couches.  (Here's the link if you missed that post).  I've had my cute little car for about 3 years now, and while I've vacuumed it, plenty, I've never cleaned the car mats.  They were dirty.  Since we'd had success cleaning our couches with Resolve, I figured I would try it out on the mats.  I am going to be bold and show you what they looked like...remember I have a 3 1/2 year old, no judging here!

Tuesday, July 3, 2012

How to Clean Your Couch

Pin It
A long time ago we paid to have our couches cleaned professionally.  It was pretty pricey, and took a VERY long time.  After a while they started to get dirty again, surprise!  Well, one day I came home, I don't even recall where I was, and I was greeted with a wonderful surprise, my husband had taken it upon himself to clean our couches.  He had what I considered a genius idea.  He took Shout, a scrub brush, and hot water and cleaned the couches completely.  It was amazing.  It's been almost a year or since then, and the couches again were looking like they needed some TLC.  I didn't have Shout, but I did have Resolve, since they are both stain removers for laundry, I figured they would have the same end result.  (The toothbrush is so my son could help me clean the cushions, he loves to do what we're doing).
I tried to get good pictures of how dirty the cushions looked...

Saturday, June 30, 2012

Cover the Safety Railing

Pin It
When we took down my son's crib and upgraded him to a toddler bed, we would often go in and check on him after he had fallen asleep.  A lot of the time we would find him rolled over to the side with his head leaning ON the little safety railing.  The bed is made of metal, sounds comfortable, I know...
My husband mentioned that we should put something over it, immediately I knew what I should do...
I went to the dollar store and got a pool noodle.  I let my son pick out whatever color he wanted.  He felt like such a helper :).  I brought the noodle home and put it up against the bar, and cut it to the right length.

Thursday, June 28, 2012

Leftover Chicken Broth?

Pin It
When I am making a recipe that calls for chicken broth, I have noticed I don't always use the whole can.  I decided to try a little experiment and see if it can be frozen...guess what, it can be!  Yay!!  The only thing I had on hand was an ice cube tray, so I poured the leftover broth into that and put it in the freezer.  Once the broth was frozen I popped them out of the ice tray and put the cubes in a ziplock bag, and just kept them in the freezer.  Each cube is 2 Tbsp. of broth.   
Another 'experiment' I wanted to try was to see what would be the best way to use the cubes.  I was making a sauce in a skillet on the stove, and I needed just a little bit of broth.  I grabbed two cubes from the freezer and threw them in the pan.  They just melted, and it worked perfectly!

Tuesday, June 26, 2012

Baked Chicken Taquitos

Pin It
These taquitos are SO good!  The tortilla is perfectly crispy, while the filling is creamy and flavorful, mmmmm...
Chicken Taquitos
Makes 12 Taquitos (about 6 servings)
  • 3ounces cream cheese
  • 1/4 c. green salsa (I got a good sized bottle from Wal-mart for $1.68)
  • 1 Tbsp lime juice
  • 1/2 tsp ground cumin
  • 1 tsp chili powder
  • 1/2 tsp onion powder
  • 1 (large) clove garlic, minced
  • 2 Tbsp chopped cilantro
  • 2 Tbsp chopped green onions
  • 1 c. shredded Mexican cheese blend
  • 12 soft taco sized tortillas
  • 2 c. cooked shredded chicken*

Saturday, June 23, 2012

Spout Extender

Pin It
My son is ALL about having things 'his size'.  I think all kids feel the same way.  It makes them feel important.  
Well, a couple of things were on my mind when we created this next craft
  1. My son was getting too big for me to hold up to the kitchen sink when he needed to wash his hands, and,
  2. I felt bad holding him up to the sink because I always feel like the edge of the counter is pressing into his little tummy
So, we had just finished this bottle of Mountain Dew, and I thought we should put it to some good use!  Yay for reusing!!
 I first cut off the top of the bottle, 

Friday, June 22, 2012

No-sew Super Why Cape, Mask, and Why Writer

Pin It
For a while my son started really getting into a show called Super Why.  It's all about teaching kids how to read, I believe it's on PBS.  His favorite character on the show is the main one, Super Why.
Super Why image was found through Google.

I thought it would be so fun to turn my little guy into Super Why, he LOVED the idea as well.
So, I took an old shirt that didn't really fit anymore, turned it inside out (so I could see the seams), 

I cut along the inside of the inseams from the bottom all the way up and around the neck.  Don't cut the neck.  Voila!  Instant cape.

Thursday, June 21, 2012

Marbled Fondant

Pin It
This was my second attempt ever at using fondant, and I thought I would try something new, again.  One of my brother's was having a birthday/Sunday dinner at my parent's house, so I figured was a good excuse to bust out a new cake.  

I made the fondant a light almost mint green color using regular liquid food coloring.  It was also my first attempt at a two-layer cake.  Yay!  

Yay's for me:  I didn't roll the fondant out as thin this time.  Also, the bottom part of the cake looks much cleaner and almost perfectly flat/straight edged  all the way around, and pretty dang good if I do say so myself :)


Boo's for me:  I probably should have finished off the top somehow, maybe even written 'Happy Birthday' or something, but to be honest, we were running a little late, (I didn't quite give myself loads of time to finish this...)

After covering the cake in the green fondant I had some left over and thought I should experiment with it.  I wanted to do a design and change the color, so I grabbed some liquid blue food coloring and started to mix it into the fondant with my hands.  

The result: this cool blue marbled looking fondant.  I cut it into strips and laid the strips around the two layers.  (They kind of look like strips of gum huh?)  

A helpful hint: to get the fondant to stick, moisten the side that will be placed on the cake with a tiny amount of water.

Much better than my last attempt!  Practice makes perfect!  Endless possibilities here, don't be afraid to try something new!!

Tuesday, June 19, 2012

Mini Fruit Tarts

Pin It
These are by far my favorite dessert!  I was so happy when I found a recipe for them, they are SO easy!  Don't they look heavenly? :)


Mini Fruit Tarts
Ingredients
  • Tart Crust:
  • 1-1/2 cups flour
  • 1/4 cup superfine sugar
  • 1/4 teaspoon salt
  • 1/2 cup butter (1 stick), chilled
  • 1 egg yolk, broken with a fork

Sunday, June 17, 2012

Fondant Roses

Pin It
I know I'm no where close to be a pro at cakes or fondant.  This was my first time making it and using it.  Setting my sights high, I know!  I searched Google for a tutorial on how to make fondant roses, and I found this video.  (I didn't have a sheet protector, so I actually just put it on the counter with plastic wrap.  I also don't have the color paste, so I just used regular food coloring, and it wasn't sticky.  I also didn't have the gum stuff she mentions, and the roses held up on their own.  Wow, you'd think if I was missing so many components I would have failed...I defeated the odds ha ha:)).  I was super excited because it looked so easy, and it really was!

My very first rose, I know it's not perfect, but I was so proud!


After making a couple I didn't want to lay them on the counter because the petals would flatten, so I inserted toothpicks in the bottom and stuck them into my dish sponge, and it totally worked!  They stayed like that until I was ready to put them on the cake.


This was the final product.  I kept the toothpicks on the roses and stuck them into the cake.  I learned something while doing this cake, I rolled the fondant our too thin, so you can kind of see the cake through the fondant, so keep that thicker.  Also, I had to put a border of frosting around the bottom because it wasn't nice and even in some parts.


Also, some of the fondant started drying out, and that's where I got the little cracks around the edges of the petals.


I'm so glad I decided to try this.  I'd always wanted to, and I definitely learned some tips for next time!  If you don't try, you'll never know!

Related Posts Plugin for WordPress, Blogger...