
Hello world!
This week I was in the mood for a project.
This is what I was up to, what do you think??
I'm pretty pleased with it, I especially love the colors!

(so I'm not sure who to give credit to for this awesome idea...)
I knew I had to tackle this craft when I realized I had finally gotten sick of looking at this mess just looming on my night stand...

I'm starting to sound like one of those over-dramatic infomercials...maybe I should have taken a picture of myself in black and white trying to untangle it, and then giving up and looking frustrated...
Sorry, I couldn't help that :)
Anyways, I had this old picture frame that we haven't used in years, but the corner was broken,
nothing a little glue couldn't fix!

My weapon of choice...I love this stuff!!

Supplies you'll need
any size/shape picture frame
paint
ribbon
thumb tacks
nails
nails
jewelry!
We got our paint and ribbon from Michael's.
The paint was .50 cents, and the ribbon was $1.63, so I spent a total of
$2.13 on this!
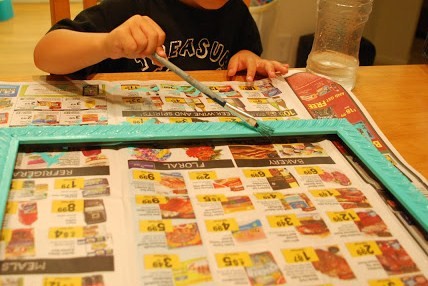
The first step is to paint the frame, top, side, and inside.
I didn't use any primer, we just went right at it with our paint.
We ended up doing 2 coats.
 I had seen some other earring holders where they would use a staple gun to attach the ribbon, or string, or whatever they were using.
I didn't use any primer, we just went right at it with our paint.
We ended up doing 2 coats.

Well, I don't have a staple gun, so I figure thumb tacks were the next best thing.
I figured right!!
 I could have very easily just pushed the thumb tacks in, but I wanted let my son continue to help, so I let him hammer the tacks in.
We used 2 tacks on each side, I figured this would keep the ribbon from tearing.
I then cut out little holes along the middle of the ribbon for the earrings to go through.
I then decided to 'paint' each hole with clear nail polish, because I figured it would keep the earrings from tearing through the holes.
 Next, I measured out where I wanted the 'necklace hooks' (aka plain old nails) to go, and then hammered them in.
 Next, add your earrings...
 and your necklaces!
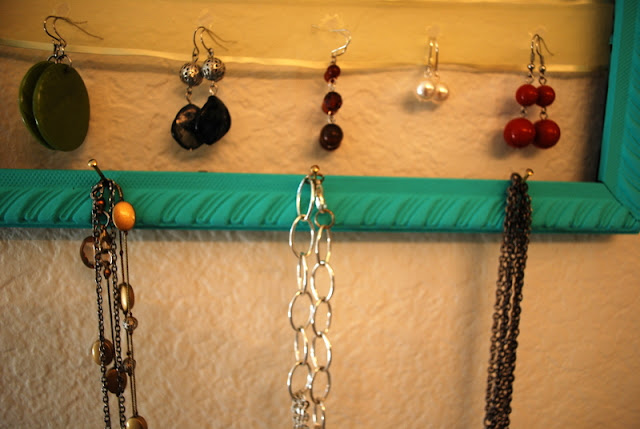 That's it!
See, I told you it was easy! :)
I figured right!!

I then cut out little holes along the middle of the ribbon for the earrings to go through.
I then decided to 'paint' each hole with clear nail polish, because I figured it would keep the earrings from tearing through the holes.


See, I told you it was easy! :)
I LOVE this, Michelle! It looks great! (and I love your little helper). Love the turquoise paint.
ReplyDeleteThanks! It was a fun craft to make, we had a good time :)
DeleteSuper cute. I love how it turned out! Found you from the hop, would love a follow back!
ReplyDelete14sixty.blogspot.com
Thank you!
DeleteThis is stinkin adorable!!! That turquoise is cute too.
ReplyDeleteNew follower from Friday Chaos.
Falen
www.upwardnotinward.com
First, how cute is your son! He is adorable and a great painter! Your jewelry rack looks amazing! Love the turquoise! Stopping by from the Friday Chaos hop! New GFC follower!
ReplyDeleteLeslie
http://sincerely-leslie.blogspot.com
Ha ha thanks, he's had lots of practice!
DeleteI need this!!! I found your blog on Southern Lovely and I am your newest follower. I would love for you to follow me back so that we can continue to share ideas. Looking forward to more posts! :)
ReplyDeleteSarah@
www.blissfulbucketlist.com