

Currently lighter cabinets seem to be the on-trend option for kitchens, but I actually LOVE my dark cabinets. The only down side to having the dark cabinets is the darker feel to the kitchen, (and it doesn’t help that we only have one small window over the sink)...not only did adding the white subway tile give the kitchen an overall brighter look, it makes it feel so much bigger as well.
Both wins in my book!
I’ve listed/linked all the supplies I used for this project below, and I’ll also go over any tips, tricks, and thoughts.
Kitchens that don’t have a full height backsplash will have something that goes about 4” up the wall. It will be a continuation of the counter. In our case it was granite. A 4” piece of granite ‘backsplash’ went around the whole counter area, as you can see in the picture below.

I’ve seen people leave the existing 4” backsplash and just add tile above, but to be honest, I kind of hate that look. I personally feel like it takes away from the whole point of the tile design.
I knew that removing the 4” slab of granite was the first thing I needed to do.
I have posted a full separate tutorial on how to remove the granite backsplash slab here How to Remove Granite Backsplash Slab I go through the steps and process on how, and why I removed the slabs.


Once I had removed the slabs, and adhesive residue, I got started with the tile.
I had spent a *long* time debating on the tile design, color, and grout color. I hadn’t seen a lot of ideas with darker cabinets and white tile so I had to imagine the outcome in my head (which made it so stressful!).
I found this White Satori Subway Tile subway tile at Lowe’s, and grabbed 30 ‘sheets’.
I had this AcrylPro Tile Adhesive from The Home Depot on hand (leftover from a different tile project I worked on last year), so I thought it would be perfect for this project as well.

I took the outlet covers off, then got to work. I scraped the tile adhesive on to the back of the ‘tile sheet’ and placed it on the wall. I made sure to press hard and kind of move it a little side to side to make sure it got a good stick. I put tile spacers between the bottom row of tiles and the counter top. I then placed spacers between where the corners meet.
Even though these came in a ‘sheet’ they don’t stay evenly spaced apart without the spacers. The spacers help everything stay in place. My tile job would be completely off if I didn’t use spacers!


The spacers I used are these 1/8” Tile Spacers from The Home Depot.
I pulled the oven out to tile across behind it without leaving any gaps.
I took a couple of days to complete placing the tile. (I had a lot of interruptions!) but the nice thing is, you’re supposed to let the adhesive dry completely before applying grout, so letting it sit a little didn’t hurt.
After completing the tile I realized I wanted a tile trim to go along the top between the cabinets and tile, and inside the kitchen window to give it a streamlined look.
I got this Tile Trim from The Home Depot (I got 4 packs).
I used the same tile adhesive on the trim as I did for the tile itself.
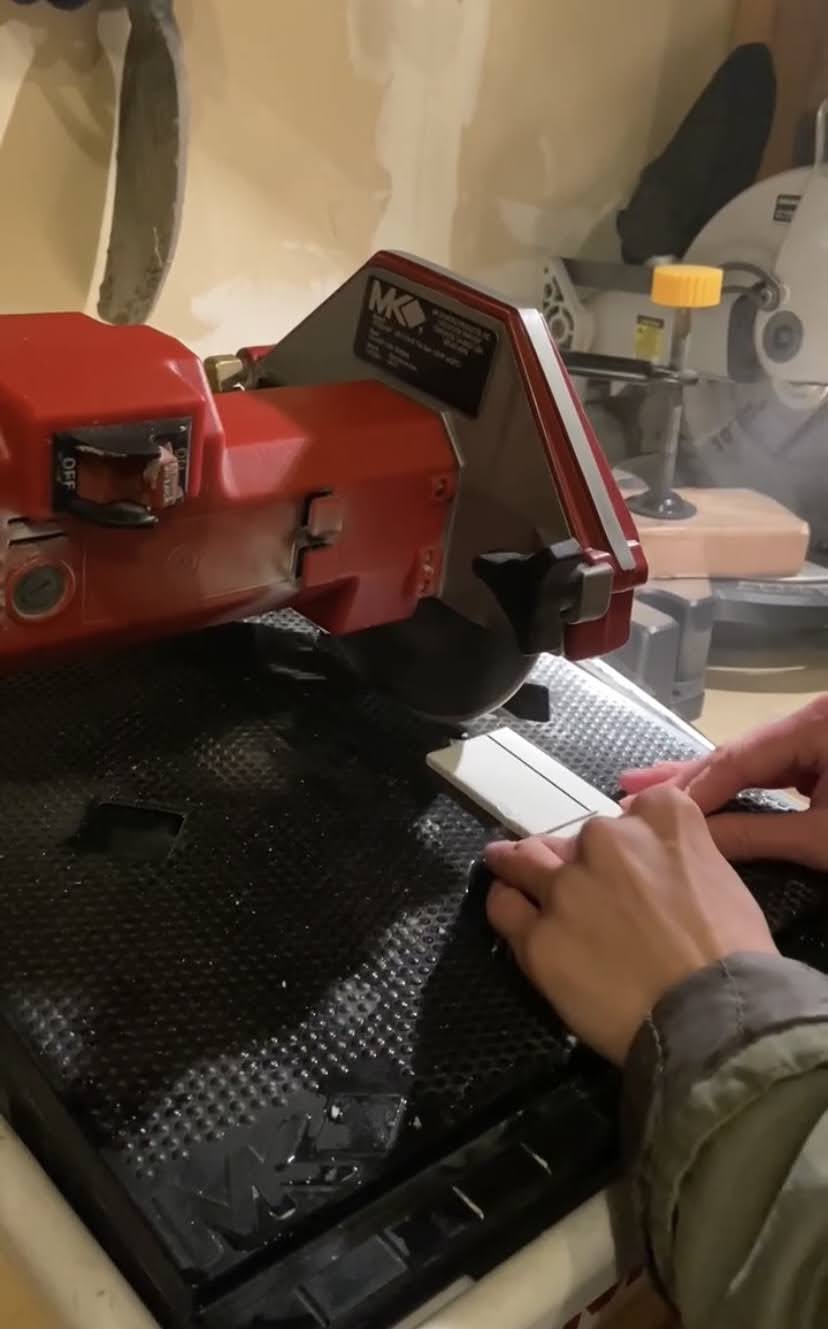
For the tiles that go around the outlets, I needed a wet saw. I rented a mini tile saw from The Home Depot and it worked perfectly! It was about $20 for 24 hours so I made sure to have all of my measurements planned out before I picked it up so I could just cut the tile once I had the saw.

My one helpful tip with this was to write a number on the wall where the tile was going, then measure out the cut on the tile. I would then write the same coordinating number on the back of the tile (with permanent marker) so I knew where it was supposed to go after being cut.


I did notice a few tiles in the corner, where the walls meet, that weren't completely straight. I took the heat gun I had used on the granite backsplash slab and ran it along the tile for a few seconds. It softened the adhesive behind the tile just enough so I was able to slightly shift the tile to straighten it out. I'm so glad I took the time to fix those few tiles. It would have been extremely noticeable if I had left them and gone on to grouting.
After the allotted drying period, I got to the grout work. I used this pre-mixed grout Simple Grout in Natural Gray from The Home Depot. I felt like the Natural Gray was the perfect pop of darker color to go with the white tile.
I made sure to tape off the counter top, as well as any areas I didn't want the grout accidentally touching, and got to work.


I didn't want wood for the window sill, I loved the idea of this acrylic material because it was already the color I wanted and I felt like it would be more durable and longer lasting. It wouldn't get warped after years of water exposure from the sink.
After cutting the acrylic trim to size, I installed it with liquid nails.


Along the edges where the counter and tile meet, between the walls, and between the tile and window, I used this Sanded Tile Caulk in Natural Gray. It matched the pre-mixed grout color perfectly.
A lot of time, and second guessing, went into this project, but I'm so glad I stuck with it and saw it through!


That is so awesome! I have always loved the look of that kind of backsplash, and it is even more impressive that you did it yourself! I'm too lazy so I just paid someone to come change the color of my kitchen cabinets to give my kitchen a new look. Maybe I should come have you do my backsplash. (;
ReplyDeleteThe gray grout did help transition the white subway tiles and your dark cabinets. I'd like to suggest getting a brighter or lighter countertop like Empira White from Caesarstone. It will reflect the light to and fro the kitchen to contrast the dark floors and cabinets. I also like to suggest getting better lighting and discard yellow light.
ReplyDeletegreat for any novice out there who's going tiling the first time ,clearly explained.
ReplyDeleteumywalka kamienna
ReplyDeleteHii
Thank you for sharing this information. That's absolutely fantastic! I've always admired the aesthetics of that backsplash, and it's even more impressive that you tackled it yourself. Personally, I opted for the easier route and hired a professional to update the color of my kitchen cabinets for a fresh look. Perhaps I should consider having you work on my backsplash as well. Here is sharing some Apigee Training journey information may be its helpful to you.
Apigee Training
The way you describe everything in your post is amazing. Olivia Carter is also providing very informational content on her website about backsplash ideas for kitchen.
ReplyDeleteAbsolutely love this backsplash reveal—what a beautiful transformation! The design feels fresh, bright, and perfectly balanced, making the whole kitchen look more inviting. A porcelain subway tile backsplash is such a smart choice for both style and durability, and you’ve showcased it wonderfully here. Your attention to detail really shines through. Thanks for sharing this inspiring project!
ReplyDeleteWhat steps should you take after falling victim to an online scam?
ReplyDeleteWith the rise of digital finance and online interactions, the shadows of crypto scams, forex scams, romance scams, donations scams and other online investment frauds have unfortunately also grown. But there's a beacon of hope – Mikhail Group Programmer Cyber Security ORG.
We specialize in fund recovery services, offering expert and reliable assistance to victims of various online scams. Whether you’ve been lured into a faulty investment, tricked by a too-good-to-be-true romance scam, or caught in the web of crypto or forex deception, our team stands ready to support and guide you through the process of reclaiming what’s rightfully yours.
Don’t let scammers get the last laugh! If you or someone you know has been a victim, it’s time to take action.
If you've fallen victim to an online scam, follow these steps:
1. Contact us: Reach out to our team for expert guidance and support.
2. Report the scam: Inform your bank, credit card company, or relevant authorities.
3. Gather evidence: Collect all relevant documents, emails, and transaction records.
Contact Us Today! Let our team Service help you navigate the recovery journey with confidence and expertise. Your first step back starts here. WhatsApp +1 (386) 348-7838
Notice: All cryptocurrency transactions are recorded on blockchain ledgers, using unique addresses to identify users. With the right tools and expertise, tracing crypto is more possible than you might believe. Do your research about blockchain ledgers and consult Mikhail Group Programmer Cyber Security ORG. for crypto recovery assistance.
Cyber security agency #CryptoSafety #BlockchainSecurity #Blockchainledgers #cryptocurrency #cryptorecovery
This comment has been removed by the author.
ReplyDeleteLove the result! Removing that 4-inch granite slab was definitely the right call for a cleaner look. For anyone else planning a remodel, exploring the different types of tile we install is a great way to find the perfect material for your home!
ReplyDelete