Over the last week or so I have been dabbling in about 10 different projects around our house.
One of these said projects is re-doing our guest bathroom/the kids bathroom.
While I have not yet completed the transformation, (I still am deciding on wall decor...) I wanted to share this simple yet amazing transformation that has already made a huge difference, and anyone can tackle!
I ended up installing 4 hooks, and I've got lots of pictures to show how it all came to be.
Pictured below is our bathroom before.
Yes, I did paint the walls a fresh airy light blue color, and got a new shower curtain, but I will talk more about all those details when I post the full bathroom makeover. (Stay tuned!)
Right now I want to focus on where our towels were hanging. Or, I should say towel.
That's it, one small towel bar that only fit one towel with a very big empty wall...
I needed to change the set-up, and fast. I wanted more towel space and an easier way for my kids to hang the towels up, so I got to work.
There are 3 main pieces you can see on the towel bar. You have the main bar that runs across, and the two holders that the bar fits into. Under the bar holders there is a very small screw.
Unscrew the screw on both sides and then the bar and holders will come off of the wall.
Underneath the holders is this plate-looking thing.
Unscrew these two screws as well.
These are wall anchors to give your towel bar extra durability.
This is what those two screws, pictured in the plate above, were screwed into.
One of the wall plates had these behind it, but the other one didn't so you might not run into these.
In case you do though, just go ahead and unscrew them. (They look just like screws, and will come out of the drywall).
You will have some holes left behind, so next you will want to grab some type of putty/spackling/nail filler.
I like to have this one on hand for filling in nail holes around the house, it goes on pink and once it's dry it turns white. Once it dries you'll want to lightly sand it to make sure the area is smooth and flat.
Now onto the hooks!
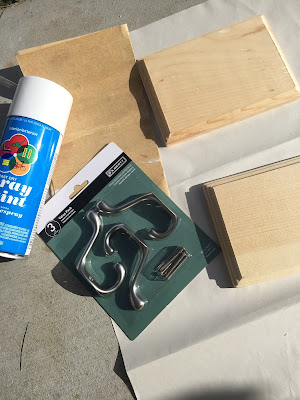
Here are my supplies. Let's take a look at what we've got.
The hooks came in a 3-pack from Home Depot for I think like $8.48. I really liked the look of the brushed silver.
The wood rectangle plaques are from Hobby Lobby. They came in a 2-pack for $2.99 each, so I got two.
(If you look in the unfinished wood section at Hobby Lobby they've got a lot of shapes; oval, rectangle, square, etc).
The sand paper and spray paint I already had on hand.
I started by sanding the wood a little bit to make it all smooth.
I then spray painted the wood. It wasn't covering like I wanted it to, so I ended up using a some paint I had on hand and a paintbrush.
Once the paint dried I placed the hooks on the wood to see where I wanted to position them.
I made a light pencil mark where the holes were going to go.
I then pre-drilled the holes through the wood because I didn't want it to split if I just drove in the screw.
The screws that came with the hooks were pretty long, so I was able to screw them through the wood right into the drywall, and that's how they're hanging up. I pulled down on them a couple of times because I wanted to make sure they could take a little weight, and they are in there good!
The wooden plaques are about 15" apart and from the floor to the bottom of the wood is 49".
I didn't want the towels touching the floor, so that's the height that worked out.
These 3 hooks are across the main wall,
and this little guy is on the wall next to the sink.
There was a ring towel holder for the hand towel here, so I used the same procedure for removing it and putting up this wood and hook.
Stay tuned for the full bathroom reveal which hopefully won't take me too much longer...


Awesome idea. I can't wait to see your other projects!! Thanks so much for sharing on our bowdabra crafty showcase!!!
ReplyDeleteThank you!
DeleteVery practical. We need these in our bathroom!
ReplyDeleteThey have become very handy to have!
DeleteGreat idea and nice tutorial on the Towel Hooks. Thank you for sharing with the Clever Chicks Blog Hop! I hope you’ll join us again next week!
ReplyDeleteCheers,
Kathy Shea Mormino
The Chicken Chick
http://www.The-Chicken-Chick.com