I can't believe tomorrow is October!
I absolutely love this time of the year.
September is still warm enough that I don't feel the season change too much, but as soon as October comes we decorate for Halloween, start planning costumes, and the overall feel just completely changes.
The other day I decided to make this pumpkin banner to add to our decorations this year.
I love that it will work for Halloween and Thanksgiving.
I was able to make this whole thing in a little less than an hour.
I've got lots of pictures and instructions for you, but please let me know if you have any questions.
*Also, if you aren't feeling too crafty I have these for sale over at my Etsy shop! Click here to find the listing.
I started out by looking through my fabric stash to see what color I wanted the pumpkins to be.
That's what's nice about this, you can make your pumpkins any color or design you want.
I found this black and white plaid fabric that was left over from a throw pillow I made and I thought it would be perfect.
The roll of burlap is 7" wide and I got it a few years ago from burlapfabric.com.
The smaller roll is just some jute cord I found at Walmart for a few dollars.
The first thing I did was cut the pennants.
They measure 5" x 7" and I cut 5 of them.
I then folded the pennant in half and cut a diagonal line from the bottom corner towards the fold.
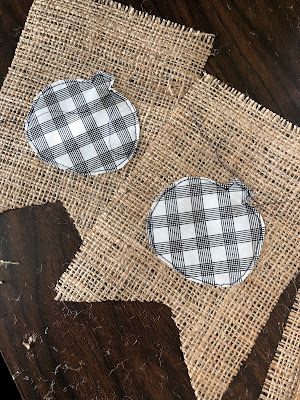
This is what it will look like when you unfold it.
I then cut the pumpkin shape out of the fabric.
I just free-handed it, and I cut out 5.
I then sewed the pumpkin to the burlap pennant.
I'd never sewn burlap before, so I wasn't sure if it would work or look right, but it turned out perfectly.
I just left my machine on the regular straight stitch it defaults to.
I gave myself some space around the edge of the fabric, I kind of liked the raw edge look.
You could also go around the pumpkin with a zig-zag stitch, I think that would look good as well.
To attach the pennants to the cord, I first tied a loop at the end (for hanging the banner up)
I then measured in about 6" and attached the first pennant.
I just used a hot glue gun and glued about an inch down, then folded the burlap over the cord.
I spaced the pennants about 1.5" apart.
You can have more space between them, or less, it's totally up to you.
I finished adding the remaining pennants and then left another 6" of cord at the end and looped it off.
That's it!
Again, if you're not feeling like you want to make your own banner, head over to my Etsy shop and grab one that's ready to go!
Again, if you're not feeling like you want to make your own banner, head over to my Etsy shop and grab one that's ready to go!


No comments:
Post a Comment