Years ago I worked at a doctors office and in the waiting room there was an area for kids with a magnet board around the whole wall.
Ever since then I have wanted to make something like that for my kids.
Yes folks, this idea came before the days of Pinterest.
Gasp! :)
As always, I've got lots of pictures for you on how this all came together!
(Sorry the pictures aren't the best quality, I used my phone for all of them. I know, I know...)
So here's a quick run-down of the supplies and where I got everything.
- Wood trim (there were extra scrap pieces in our garage when we moved in)
- some type of sheet metal (my parents had some left over air duct metal, see how it's curved in the picture below)
- tin scissors (borrowed from my parents)
- hammer
- saw
- nails
- nail hole filler
- paint
The metal I got from my parents was already the size I needed, so I didn't need to cut down the size.
Since the metal was for duct work it had a raised part on the edges, so using the tin scissors, I cut that part off so it would lay flat against the wall.
Here's a close-up of the excess part I cut off.
Be careful, it's very sharp once you cut it!
I think I ended up with 4 or 5 cuts on the knuckle part of my thumb.
If you follow me on Instagram you might have already seen some of these pics! Lucky you ;)
I found that the best way to do this was to cut a section and then kind of fold it up to keep it out of the way,
I then went out to my garage and laid out the metal and wood trim pieces.
You want the trim to be slightly longer than the metal. This gives you the ability to cut diagonal corners and not be short.
Using a circular saw I borrowed from my parents, I made a straight cut first.
I cut 3 pieces of wood.
1 to go across the top, and 2 for the sides.
Here are the finished pieces.
I honestly didn't measure the angles.
I cut the end at an angle, then placed the cut part on top of the other piece and drew a line of how that angle was so they would match up.
Does that make sense??
I looked up different ways to attach the metal to the wall, and even tried a few different methods, but it turned out the most effective thing was just holding it in place and hammering in some nails.
The nails had no problem going right through the metal into the wall.
Next came the trim. I really wanted the trim around the metal to help finish off the look, but to also keep the sharp edges hidden.
For the trim, I just held the piece where I thought it should go and nailed in some nails.
Again, I didn't pre-drill any holes.
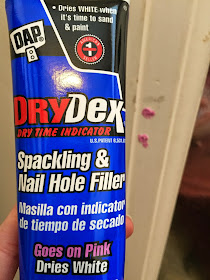
Next I filled in the nail holes in the trim. I found this filler at my local Wal-mart.
I liked the smaller size, and that it probably won't dry out since it's just in a squeezable tube.
It goes on pink and then dries white.
Once the filler was dry I lightly sanded it.
Using some touch up paint we received to match our trim when we moved in, I then painted all of the trim. I did two coats of paint.
I'm glad I finally got around to creating this because it's saving my poor fridge from being scratched like crazy from little magnets!
Hope you enjoyed!
As always, let me know if you have any questions!
As always, let me know if you have any questions!


This is a pretty cool idea. I have always used my frig as magnet board for my kids when they were little but I love this idea better. Thanks for linking up at #HomeMattersParty this week. Looking forward to seeing what you post next week.
ReplyDeleteThanks! I notice lots of little scratches on our fridge, so hopefully this will help prevent more!
DeleteGreat idea! Useful for kids or adults really. I can so see this in my craft room to pin inspiration, notes, lists! Plus get's the kids out of the kitchen when you are cooking! Thanks for sharing with us at the creative craft challenge!
ReplyDeleteThanks! He has yet to make good use of it, so we'll see if it's worth it!
Deleteso my nicer than our corkboard in our kitchen. Love the modern feel to it.
ReplyDeleteThank you :)
DeleteIt looks fantastic. And it's at the right height for the short people too.
ReplyDeleteU seem to have taken some pains to get this done! Its super cool, the trim has come out real well.
ReplyDelete-FarZain
@http://colorsofourrainbow.blogspot.ae/
Thank you, it's worth it to see my little one play with it!
DeleteSuch a fun idea! Thanks for linking up with Best of the Blogosphere
ReplyDeleteVery creative! We use a dry erase board for the same purpose but it's not as cute as your creation! Good job!
ReplyDeleteHa ha well thanks!
DeleteThats a great idea. I will have to do this for my little one. Thanks for sharing on Oh My Heartsie Girls WW
ReplyDeleteThe magnet board looks so adorable! It seems quite simple, but I bet the kids are having fun playing around with it. It truly is amazing what one can make out of metal sheets. Anyway, it seems like a lot of the stuff you needed came from your parents, it was a good thing they lend those to you. Anyway, thanks for sharing!
ReplyDeleteBernice Parsons @ Badger Anodising Ltd.